
Complete the auto-sync initial setup
Published:2026-08-07 16:20/Updated:2026-09-16 16:26
Choose the SHOPLINE and middleware connections, pick the inventory location, pass the SKU uniqueness check, then save and enable.
Once you have both a SHOPLINE connection and a linked-system connection (LOGILESS or CROSS MALL), run the auto-sync initial setup. The setup has 4 steps, completed from top to bottom. A finished step collapses into a one-line summary; you can return to it at any time with [Change]. Once you save and enable in step 4, however, you cannot return to the initial setup (see below).
| Step | Heading | What you do |
|---|---|---|
| 1 | Link configuration | Choose which store's orders flow to which linked system |
| 2 | Link integrity | Check that products, delivery methods and payment methods match on both sides |
| 3 | Pre-checks | Run the connection test |
| 4 | Activation | Save and start auto-sync |
How to open it
Open [Order & Inventory Auto Sync] from [Tools] in the left navigation. If nothing is configured yet, the "Initial Setup" screen is shown.
Step 1: Link configuration
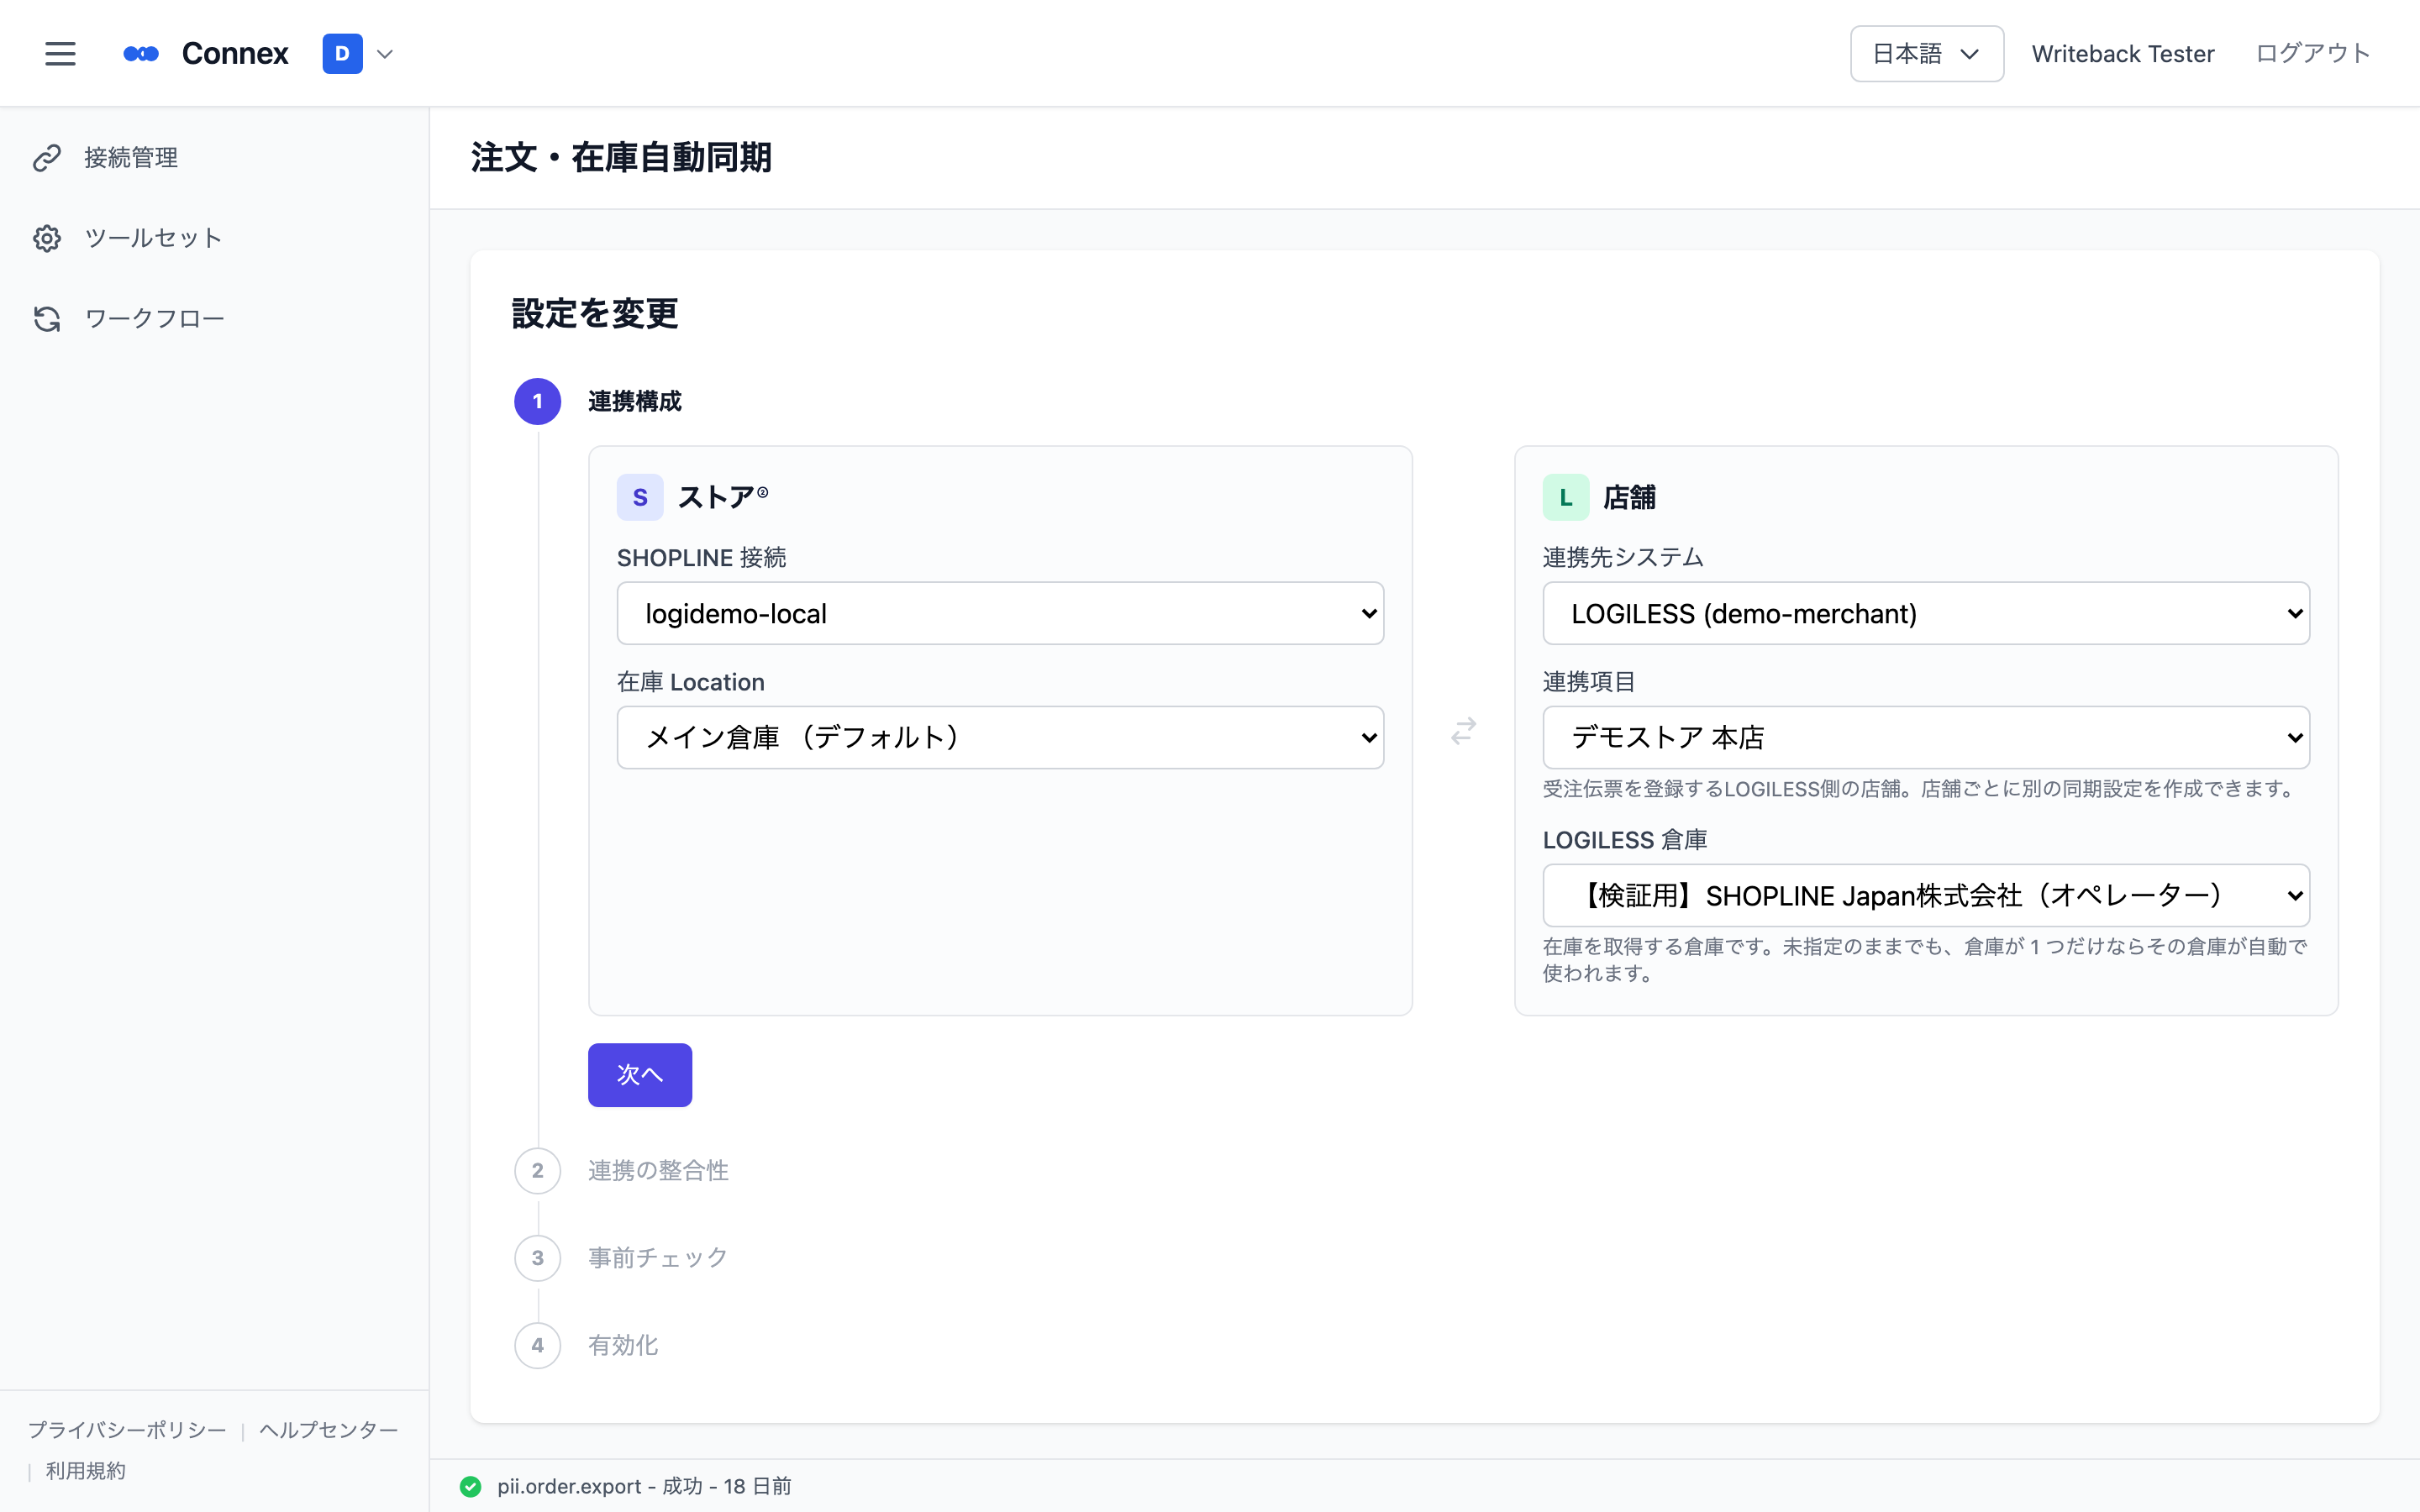
The left side is the Store (SHOPLINE), the right side is the Linked system.
- Under [SHOPLINE connection], select the SHOPLINE connection to sync.
- Once a connection is selected, [Inventory Location] appears. Choose the SHOPLINE location that the linked system's stock levels are written to (the default location is marked "(Default)").
- Under [Linked system], select the LOGILESS (or CROSS MALL) connection you created.
- Select the [Connection item].
- LOGILESS: the LOGILESS store in which sales orders are created. You can create a separate sync configuration per store.
- CROSS MALL: the connection item to use (the order-receiving email + FTP pair).
- (LOGILESS only) Under [LOGILESS warehouse], select the warehouse to pull stock from. The first warehouse in the list is preselected, so with a single warehouse you can leave it as is. If you have several warehouses, pick the one whose stock should be written to SHOPLINE.
- Click [Next].
Caution
The warehouse cannot be changed once initial setup is complete (the screen also says "The warehouse to read stock from. It cannot be changed after initial setup."). To switch to another warehouse, delete the configuration with [Reset Configuration] on the [Settings] tab and run the initial setup again. Only one warehouse can be synced; several warehouses cannot be written to separate SHOPLINE locations.
Step 2: Link integrity
Three cards — products, delivery methods and payment methods — show whether what exists in SHOPLINE also exists on the linked system. The card colors mean:
| Color | Meaning |
|---|---|
| Green | Everything aligned |
| Yellow | Partly unaligned (can activate) — only the affected products / orders are not linked |
| Red | Nothing aligned yet (cannot activate) |
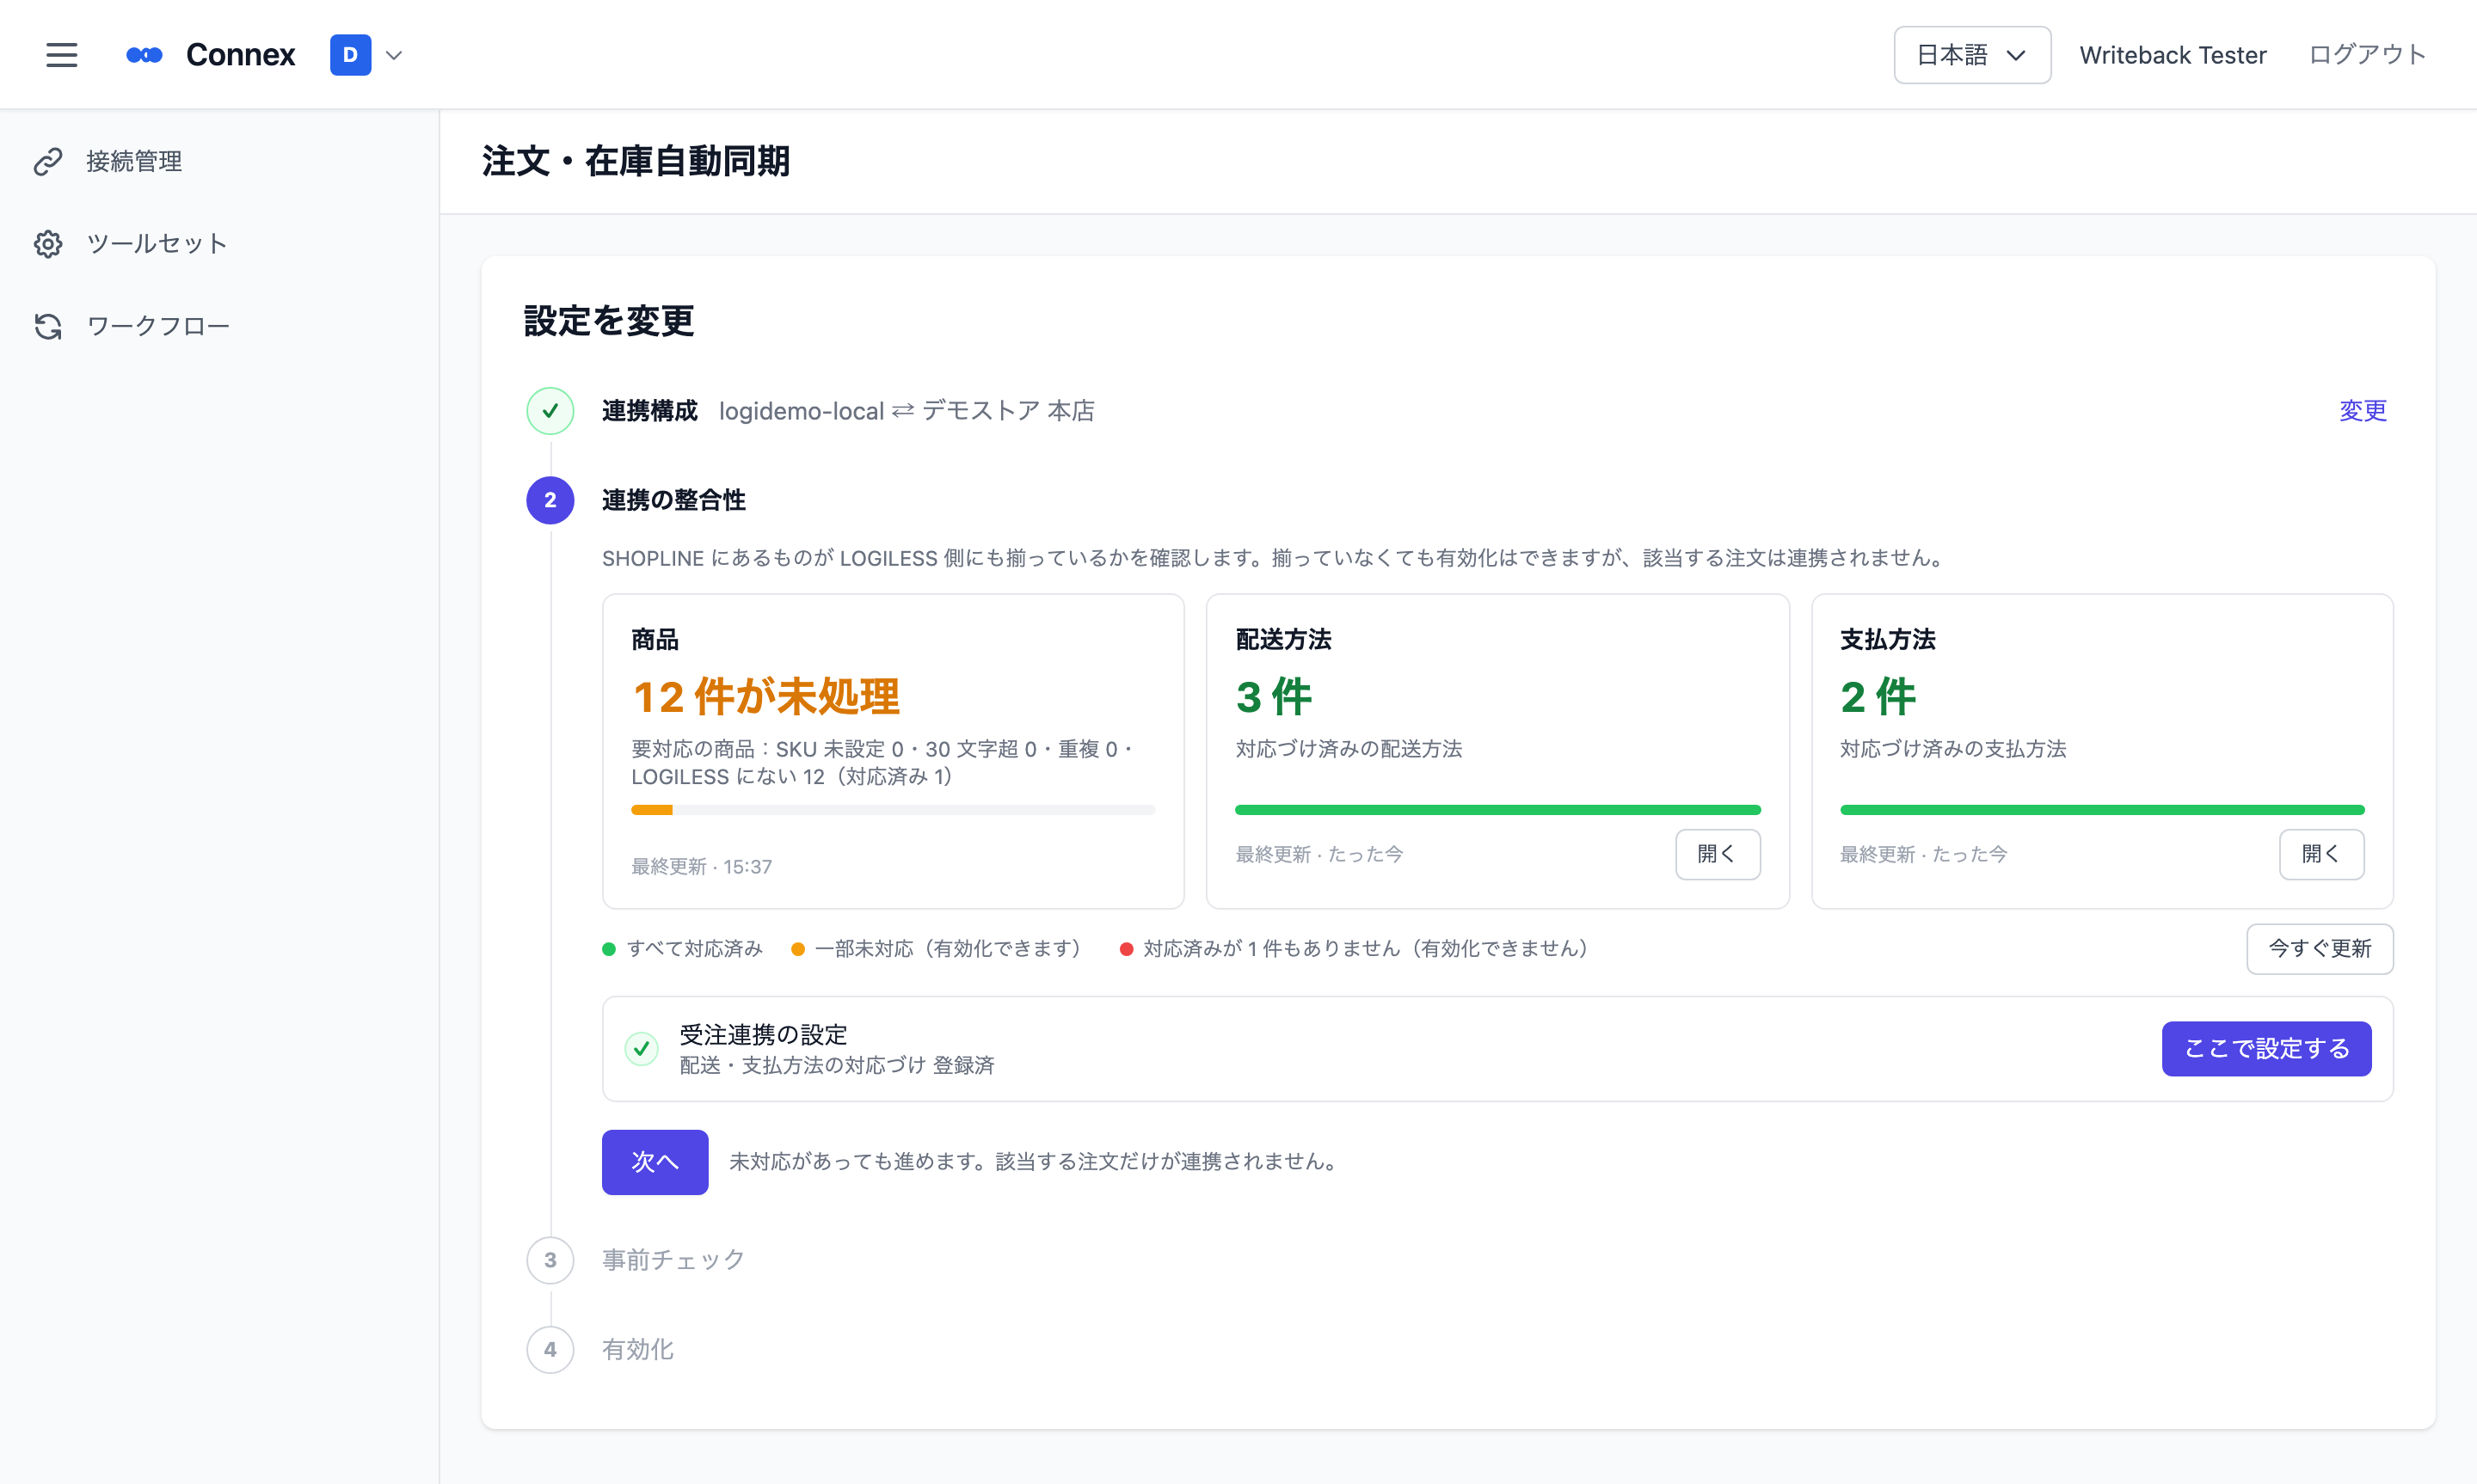
- Products: shows a breakdown of products needing action (no SKU, SKU too long, duplicate SKU, missing on the linked system). Click [Open] on the card to save the setup so far (without enabling) and go to the [Product sync] tab, where you can fix SKUs on the SHOPLINE side and register products on the linked system together (Products are listed on the Product sync tab). Saving completes the initial setup and you cannot return to the setup screen. To enable later, use the status toggle on the [Overview] tab.
- Delivery / payment methods (LOGILESS only): use [Open] on the card or [Set up here] on the "Order link settings" row to do the mapping right here (Map delivery and payment methods).
After working through the items, click [Refresh now] to recount, then [Next].
Note
"You can continue with unmatched items; only the affected orders will not sync." — you can enable even if not everything matches. There is no need to align everything before starting, but orders containing unmatched items are not sent to the linked system and appear under "Order status" on the [Overview] tab with the reason.
Step 3: Pre-checks
Click [Run check] to verify that the selected connection can communicate with the linked system.
- LOGILESS: the result is shown as "API: {status}"
- CROSS MALL: the result is shown as "Email: {status} / FTP: {status}"
If all is well, click [Next]. If it fails, check the connection status under Connections (Check connection status).
Step 4: Activation
![Step 3 Pre-checks (connection test result) and Step 4 Activation with [Save & Enable]](https://api.connex.ortu.me/api/help/assets/89a6bcfe226b764a.png)
Click [Save & Enable]. The configuration is saved and auto-sync starts. From then on the operations screen is shown (Check status and history on the operations screen).
Warning
Once you save and enable, the connections, Inventory Location and warehouse can no longer be changed ("Link configuration" on the [Settings] tab is read-only). If you need to change them, delete the whole configuration with [Reset Configuration] on the [Settings] tab and run the initial setup again.
If "Cannot enable." is shown and the button is disabled, one of the following is zero. Map it and the button becomes available.
| Message | Where to fix it |
|---|---|
| No product can be linked yet | Set SKUs on your SHOPLINE products and register them on the linked system with the same product code |
| No shipping method has been mapped | Map delivery methods from "Order link settings" in step 2 |
| No payment method has been mapped | Map payment methods the same way |
Note
The first sync right after enabling pulls stock from the linked system. Once a time appears under "Last inventory sync" on the [Overview] tab, it is running. If you do not want to wait 5 minutes, click [Sync now] at the top right of the screen.
Was this article helpful?